I was recently reading a post on one of the boards and came across a fellow who was having a problem with Fusion 360:
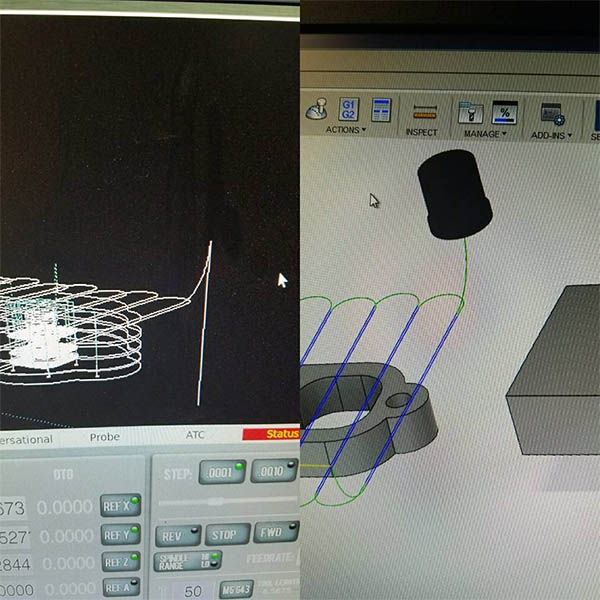
Control view on the left, CAM on the right: see the problem?
The controller view of the toolpath is on the left and the CAM view is on the right. Do you see the problem?
If you run that program, at the end of the toolpath, the cutter is going to arc up and then slam right back down deep into your part and possibly a vise or your machine table. Ouch!
This stuff comes up all the time with most any CAM software that’s available–it’s not just a Fusion 360 issue. All software has bugs, and the more complex the software, the more likely there are problems lurking. Given that CADCAM is some of the most complex software CNC’ers will ever use, it’s no wonder that these glitches can show up.
As this particular fellow said, “I’ve got parts to get out and then this shows up.” This sort of thing always happens when you don’t have time to deal with these CAM glitches by trial and error.
By the way, isn’t it interesting that the CAM simulation doesn’t show the problem? This is the thing about many CAM simulators. CNC’ers think, “I don’t need simulation, my CAM software has it built in.” Unfortunately, for 90% of CAM software, you are not getting a true second opinion on your g-code. That’s because most CAM simulators work from the geometry not the g-code. That leaves a world of room for the same bug that trips up the g-code generation to trip up your program and not be visible in the CAM’s simulator. If nothing else, an error of some kind in your post will be totally bypassed.
If you don’t get a true second opinion, using a simulator that goes purely from the g-code output by your CAM, you’re vulnerable to these problems. In a production shop, if you wait to see the problem when the g-code is actually on your CNC machine, you have tied up that machine needlessly when it could have been doing something else while you fix the problem.
So how do you fix these problems?
Well, for many CNC’ers, they try redrawing or re-CAMming the part in a couple of different ways. Maybe the problem goes away or maybe it doesn’t, but it sure is painful to do this by trial and error. Perhaps you get on the boards like this CNC’er did and ask for help. In this case, he drew a simplified but similar part and ran the same kind of toolpath and there was no problem. He concludes there’s something about the drawing, but what?
A number of the more experienced CNC’ers on the thread pointed out that he should just edit the g-code and move on with his work. It’s actually the quickest easiest way to deal with this kind of problem if you check your CADCAM work and nothing is obviously amiss. Especially when it is just one errant move.
But Bob, I Don’t Know G-Code Well Enough to Fix This in the G-Code!
Yeah, I know, I hear that a lot. We sell a g-code editor/simulator and the majority of folks I offer it to have no idea why they would want it. As far as they’re concerned, they bought CAM so they’d never have to deal with g-code. G-Code is cryptic, scary, and complex.
Or is it?
Here’s the thing. If you crack open a Fanuc manual, or maybe even Peter Smid’s archetypal textbook on g-code programming, it can look daunting. But here’s a secret: it isn’t really–not at the level you need to deal with problems like this.
Let me let you in on another secret: CAM software is really dumb when it comes to g-code. It almost always uses a super simple dialect that uses very few g-codes of the many that are available. You don’t have to learn the whole g-code language to understand the Super-Simple Pidgin G-Code that CAM puts out!
Here’s another little secret: Our G-Wizard Editor will tell you what every g-code does in simple English! That’s right, it’s your secret decoder ring for making cryptic g-codes obvious. Plus, it’s built-in simulator will show you problems like the one above immediately.
I always check the g-code from my CAM before I put it on my CNC Machine. It doesn’t take but a couple of moments and it has saved me so much heartache. Because you see, there often are things going on there that just weren’t visible to CAM simulators.
So let’s dig into this business of reading and writing CAM generated g-code.
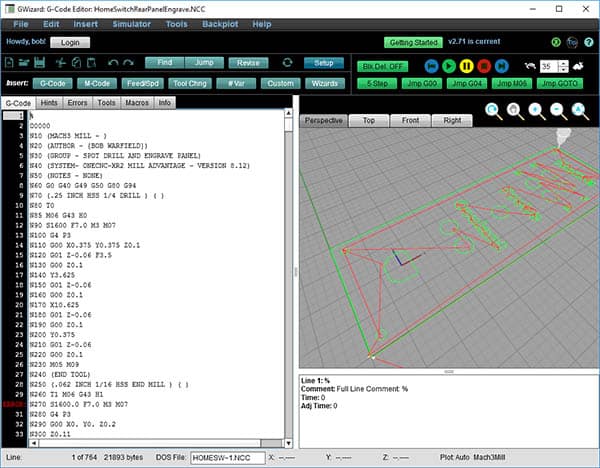
Here’s a screen shot of G-Wizard after loading a simple g-code program I used some time ago to make a little panel for the connectors on a CNC Control I built:
Panel engraving g-code…
This particular program was generated by CAM software called OneCNC. I use several CAM programs, BTW.
Most CAM g-code follows a simple structure:
There’s an introductory block of code, often called a “Safe Block”, whose purpose is to put the machine into a known state.
There’s a series of code blocks for each feature of the part.
Even if you know nothing about g-code, you can gather some things quickly. For example, comments appear enclosed in parenthesis.
But what about that percent sign, the weird “O0000”, those “N” numbers at the beginning of each line, and especially that whole gibberish “G0 G40 G49 G50 G80 G94”.
Like I said, G-Wizard decodes that stuff. If we put the cursor on a line, the area below the program plot tells you what it means. That area is called the “Hint” because that’s just what it is–hints about what the g-code is doing.
Here’s the hint for that crazy complicated line at the bottom:
Line 8: N60 G0 G40 G49 G50 G80 G94
N60 : Block or sequence number
G0: Rapid positioning (move at rapids speed)
G40: Tool cutter compensation off
G49: Tool length compensation cancel
G50: Reset all scale factors to 1.0
G80: Cancel canned cycle
G94: Units per minute feed mode. Units in inches or mm. Time: 0 Adj Time: 0
See how it takes each element of the line and tells you what it is?
N60 is a block or sequence number. Okay, you were probably starting to think those N numbers were something like that.
G0 is “Rapid positioning”, which means “move at rapids speed”.
G40 is “Tool cutter compensation off”, and so on.
There’s probably still a lot there you don’t understand, but surely those explanations make more sense than just N60, G0, G40, and the rest?
Here’s the thing–you can ignore most of what you don’t understand from the CAM g-code. Just leave it alone. For the most part, you’ll be okay modifying lines you do understand and leaving the rest alone. Especially if you have a g-code simulator like G-Wizard Editor to check your work.
Let’s move into some actual motions.
Wait. How did I know that those lines we looked at weren’t motions? Well, for one thing, you can use G-Wizard to step through your program, one line at a time, and watch what each line does on the plot. Those buttons on the tool bar that look like music play controls do that:
G-Wizard’s debugger controls…
We call them the “debugger” controls. I will let you get the free G-Wizard Editor trial to play with them rather than explain here, but if we look at the program up to line 8, there’s been no motion.
With the post I use with OneCNC, each feature starts with a tool change that has a comment telling me what the tool is. here’s the tool change g-codes:
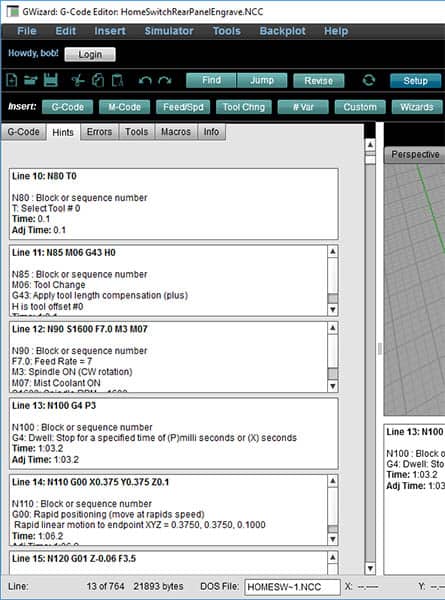
We can tell from the comment that this tool is intended to be a 1/4 inch drill. There’s more cryptic stuff that GW Editor can decode for us. In fact, there’s a tab called “Hints” that lets you see the Hints for multiple lines instead of the raw g-code:
Changing a tool and setting up the feeds and speeds…
This little section of code is all about changing a tool and setting up the feeds and speeds. We select tool zero with “T0”. By now you’re getting a sense that g-code is numerical and doesn’t understand words really. There are some exceptions, but CAM software rarely uses them. If you see words in your g-code that you recognize, they’re probably comments. The g-code couldn’t care less about “(.25 INCH HSS 1/4 DRILL ) ( )”. That’s a comment which it ignores. Instead, it only understands “T0”. What that means is there had better be a 1/4″ HSS Twist Drill in the T0 position of the Tool Changer or you’d better stick the right tool in the spindle when it stops for a manual tool change. Your CNC machine trusts you to do the right thing, because for the most part, it is deaf, dumb, and blind.
it turns out a tool change is a multipart operation too. T0 tells it which tool. G43 H0 applies a tool length offset. And M06 actually triggers the change to T0. If you don’t know what a tool length offset is, don’t fret–you will soon. It is how the CNC knows how long the tip of the tool is sticking out. You set it up in the machine’s tool table.
Next, we have to set our feeds and speeds. This all happens in one line: S1600 F7.0 M3. Or, as GWE (G-Wizard Editor) tells you:
S1600: Set spindle to 1600 rpm
F7.0: Set feedrate to 7 inches per minute
M3: Start spindle turning clockwise.
That same line has an M07, which turns on mist coolant.
G-Wizard has told you all of those things, so you needn’t remember. Pretty easy, huh?
How about that G4 P3?
That’s an interesting thing. G4 means “Dwell”, which on a CNC means wait without doing anything. P3 says to wait for 3 seconds. What’s happening is the dwell is there to make sure the coolant is flowing full strength and the spindle is fully up to speed.
Right, now it’s time to actually do something by moving the cutter. CAM software again follows a pretty simple pattern. It moves pretty high above the part to the location where it will descend. It makes those high moves at high speed using “G0” (remember, that sets rapids) to set the motion speed.
It then descends to what many CAM programs call “Safe Z” using rapids. Then it switches to “G01” mode and goes down to final depth. We’re just drilling a hole here, so the process is easy:
N110 G00 X0.375 Y0.375 Z0.1
N120 G01 Z-0.06 F3.5
Those two lines say:
Go to X = 0.375 Y= 0.375 and Z = 0.1 at full rapids speed.
Go to Z = -0.06 at a feed rate of F = 3.5 inches per minute.
Now by convention, most CNC programs treat 0 as top of part. If you can run CAM software, you already knew that. This is only going down 60 thousandths of an inch, so it is spotting that hole and not really drilling very deep.
Are you starting to get the hang of it? Can you see that if you wanted to spot the hole a little deeper, you could just edit that Z coordinate? Easy, right?
And you can use G-Wizard Editor to help you find exactly the line to modify. As you select a line of code, the toolholder symbol moves around on the plot. Or, if you click an endpoint on the plot, the g-code cursor will show you what line ended at that point in the g-code.
You can do a lot with just that much knowledge. In fact, that’s enough to fix the problem of the tool crashing that our friend had. You could simply change the Z of the coordinate from being so negative, to being positive and therefore above the part.
I want to just give you one more piece of information, just because they’re so common in these programs, and that’s a look at how G-Wizard Editor and g-code deal with arcs. Arcs are done using G02 and G03–G03 is counter clockwise and G02 is clockwise.
Here’s the hint for the first arc we come to in our program:
Line 43: N400 G03 X0.5 Y0.375 I0. J0.125 F7.0
N400 : Block or sequence number
G03: Counter-clockwise circular interpolation (move in a circular arc at feed speed)
F7.0: Feed Rate = 7
Relative IJK resolves to absolute IJK = I0.375 J0.375 K-0.04
Arc endpoint: 0.5000, 0.3750, -0.0400
Arc center coordinates: 0.3750, 0.3750, -0.0400, radius = 0.1250 (determined by IJK)
Arc angles: 270.0 to .0(270.0 degrees total) Time: 7:05.8 Adj Time: 7:08.4 V End: 7
Arcs can seem cryptic to beginners because of that IJK notation. To specify an arc, you need three things:
The starting point
The ending point
The arc center
We know the starting point, because it is just the point where the prior line of g-code ended. That’s easy to find in GWE on the hint for the prior line of gcode.
The endpoint is specified in the arc command by X, Y, and Z. Most of the time, at least one of those 3 will not be changed from the start point, so we need not specify it. In any case, GWE also tells us what the endpoint is.
The arc center is the hard part for beginners. IJK are offsets that are added to the start point to find the center. Rather than mess with that, GWE just does the calculation and tells you where the center is. It also tells you the radius of the arc which is frequently helpful, as well as the angles of the start and end points.
What’s Next?
We’ve actually seen most of what you need to perform simple edits on your CAM g-code:
You know how feeds and speeds are set. So, if you discover you need to slow down while running the program, perhaps using the feedrate override on your CNC Machine, you know how to go back into the g-code and change it for future runs. That’s a lot faster and easier than firing up CAM again.
You know how tools are set. I recently needed to change tool numbers because the tools were in different positions in my tool changer (and tool table) than the CAM software assumed. Easy to do with a g-code editor. Just be sure you have the right tool length offset set up if you change it!
You know how the coordinates work on straight lines and arcs, so you could change them. Perhaps you want to keep the tool from retracting so far to save some time, for example.
You know about the Safe Start codes and that you basically leave them alone until you know more about what’s going on. Eventually you’ll learn a little more so you can mess with Work Offsets, for example. They’re useful for taking a single program and shifting it around, perhaps so you can do multiple identical parts.
That’s actually a really good start, and it was pretty painless, right?
I recommend every CNC’er get at least this much knowledge about G-Code. It’s indispensable and will save you a lot of time and frustration.
For more information, try our Free G-Code Course. Do a chapter a day–each one is easy and full of examples using GW Editor. A chapter is 15 or 20 minutes of your time at most, and you’ll be surprised at how quickly you pick up g-code. You’ll be all set to tweak your CAM code in no time. If you stick with it, you’ll learn about Macros and the other super-sophisticated g-code stuff all the cool kids know (LOL). But for now, just being comfortable reading and modifying CAM code is a huge help.
And, don’t forget your secret weapon. Get the Free 30-Day Trial of G-Wizard Editor (come on, you know you need this in your toolkit!):
Once you get your free GWE trial installed, load up some of your CAM-generated g-code. Follow along with this article and GWE’s Hints and see what’s going on. If it isn’t making sense, read a few chapters of the G-Code Course and try again. You’ll get this and it’s easier than you think, I promise.
Readers, tell us about your experiences with CAM Glitches–do you tweak your CAM g-code from time to time to make it better or fix problems?
Like what you read on CNCCookbook?
Join 100,000+ CNC'ers! Get our latest blog posts delivered straight to your email inbox once a week for free. Plus, we’ll give you access to some great CNC reference materials including:
Bob is responsible for the development and implementation of the popular G-Wizard CNC Software. Bob is also the founder of CNCCookbook, the largest CNC-related blog on the Internet.