Sometimes you just get stuck. You need to do something and it doesn’t look like it’s possible. We’ll start with a series of feeds and speeds hacks for those situations.
#1-#3 My Spindle Won’t Run Slowly Enough for the Material and Tooling I Need
This problem happens particularly often if you have a high-speed spindle, for example on a CNC Router. If you try to cut harder materials or use large diameter tools, the rpms have to slow down. Here are three hacks to get the rpms back up there into your spindle’s operating range:
#1: Use a cutter that can take more RPM’s. Switch from HSS to Carbide. Go to a better coating that can run faster. TiAlN and similar modern coatings can take a lot more heat (they thrive on it, actually), so they can help you run your spindle faster.
#2: Use a smaller diameter cutter. The smaller the diameter, the faster it must be spun for a given surface speed. In the end, you can do most anything you would with a larger diameter cutter, it’ll just take longer.
#3: Use a HSM (High Speed Machining) toolpath and relatively narrow cut width. HSM is a force multiplier for both feedrate and rpms. The narrower the cut width as a percentage of tool diameter, the more it’ll bump the rpms. At 25% of diameter and a 1xD cut depth, you get a 1.88x multiplier on rpms, for example. The problem will be getting into the cut, as this might take a full width cut initially. Sometimes you can drill a hole to start the cut and avoid the problem.
#4-#6 My Feedrates Aren’t Fast Enough
You’ve got the spindle rpms under control, but they’re so high the feedrate has been forced to a point that’s higher than the machine can handle (at least accurately handle).
What to do?
This problem is less common than the spindle rpm problem, but here are 3 hacks to fix the situation:
#4: Slow down the spindle rpm. You can always bring the rpm down to the spindle’s lower limit or until there’s too little power available at the rpm. In fact, it’ll lengthen your tool life considerably by reducing heat while reducing feedrate at the same time.
#5: Reduce the number of flutes on the cutter. Fewer flutes means you can move through the material more slowly as each individual flute has nearly the same chip load regardless of the overall number of flutes. Sticky materials can often benefit from fewer flutes, and your surface finish may improve too as chips are cleared more easily. Use a single flute cutter if you have to, but you can get the feedrates way down. Going from a 4 flute to a single flute means 1/4 the feedrate, in fact.
#6: Try a smaller cutter. Smaller cutters have lower chip loads and will also slow the feedrate way down.
#7 My cutter keeps building up aluminum and breaking
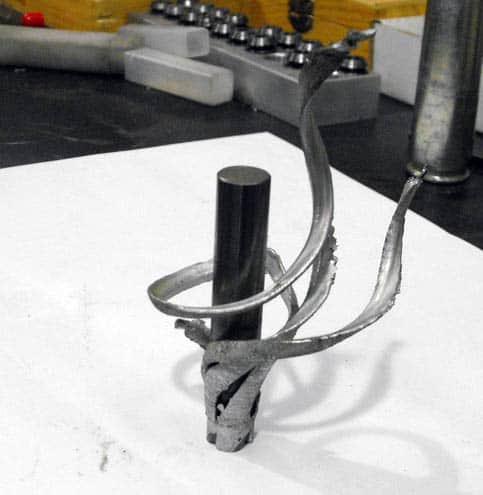
Aluminum welded to and clogged up this endmill!
This is kind of a trick one, because it is probably not a Feeds and Speeds problem. Aluminum actually has a tendency to weld itself to the cutter’s edge. When that happens, you lose the edge, you get sticky gummy aluminum building up, and you usually wind up snapping the endmill pretty quickly.
The problem is almost always lack of proper lubrication. Even a little WD-40 goes a long way, and a proper flood coolant or mist system will fix the problem entirely.
#8-#14 I can’t use flood coolant or mist lubricant for aluminum. What do you recommend?
Bad news–your cutters are living on borrowed time in many cases. There are few good substitutes for proper lubrication to stop chip welding. But, the thing to try is to maximize the clearing of chips before they can weld to your cutter’s fragile edges. Here are some ideas:
#8: Blast the cut with air or use strong vacuum to remove the chips.
#9: Avoid deep slots and pockets that make it hard to get the chips out.
#10: Keep your depths of cut shallow–try 25% of diameter or less. This is not the best for tool wear–spreading a cut along as much flute as possible is a better strategy. But beggars can’t be choosers when cutting aluminum without proper lubricant.
#11: Stick to very thin aluminum. Thin aluminum bonded to foam board, for example, is usually not a problem.
#12: Be very conservative on feeds and speeds. I know I said this isn’t really a feeds and speeds problem, but taking it easy will reduce the volume of chips produced and give more time to clear them.
#13: Use 1 or 2 flute cutters. Yes, a 3 flute can be fed faster, but fewer flutes allows more chip clearing space between the flutes and makes chip welding less likely.
#14: Use coated cutters. The coating helps lubricate and protect against welding. Just keep in mind that the coating will wear through suddenly at some point and welding starts almost immediately when that happens.
#15-#18 Dealing with Deep Pockets
No, I’m not talking about Deep Pockets as in lots of money. I’m talking about pockets on your parts that are too deep relative to the tool you’re using. Perhaps you’re forced to use that tool because the inside corners are too small and a bigger tool won’t fit.
The problem with small tools in deep pockets is tool deflection. Not only is the small tool unable to remove as much material, but it is also too long relative to its diameter and it will deflect more easily. As we’ll see below, deflection can be terrible for tool life.
How Deep is Deep?
For boring bars on lathes, we don’t want solid carbide boring bars to hang out more than about 6-7x their diameter. The same rule applies here. If we have to use a tool that sticks out more than 6x its diameter, we have a Deep Pocket and will need to take care.
Here are some hacks for dealing with Deep Pockets:
#15: Make sure inside corners are as big as they can be. Most customers will appreciate being told things they can do to make their part cheaper to manufacture. Many times the radius of the corner of a pocket was just plucked from thin air and has no real functional reason for being what it is. Confirm with the customer that you can save them money if they’ll allow the corner radii to be larger on pockets.
#16: Use a big rougher and a small finisher along with Rest Machining. Rest Machining is a CAM feature that lets the CAM package know what material was removed by prior steps. If you rough out a pocket with a big rougher, you can remove a lot of materials and leave much less for the smaller finishing tool to have to remove. Your overall time can go down substantially.
#17: Consider chain drilling, plunge roughing, or even just drilling the corners on Deep Pockets.
#18: Consider odd endmill sizes. Every little bit larger diameter of the cutter helps a lot. Perhaps you can use an odd size (metric on an Imperial job or vice versa) to get a larger diameter endmill.
Bonus Tip: Considering using a serrated roughing end mill. Those serrations slice the chips into shorter lengths which makes them easier to evacuate in tough situations, like deep pockets.
#19 – #23 Dealing with Deep Holes
The same or worse problems arise when holes are too deep relative to the diameter of the hole and hence the diameter of the cutter you choose to use. Here are the tactics for dealing with deep holes:
#19: Use a peck cycle. G-Wizard Calculator will tell you exactly when a peck cycle is needed too.
#20: Use parabolic flute drills. This change to flute geometry will let you drill much deeper holes than the average twist drill can manage. And of course, G-Wizard Calculator will tell you when Parabolic Flutes are needed.
#22: Talk the Customer into a design change. Maybe they’ll allow a larger diameter or less hole depth once they realize how expensive their hole is as originally specified.
#23: Use High Pressure Through Spindle Coolant. This can be a real lifesaver when it comes to evacuating chips from deep holes. Use our G-Wizard Calculator to get Feeds and Speeds adjusted to the potential of High Pressure Through Spindle Coolant.
Snag More Performance: Higher Material Removal Rates
Time is money. Or, if not money, to a hobbyist, time is scarce. Getting it done faster means getting more projects done in the limited time that’s available for a hobby.
You may not think you need to do it faster or you may think you’re already going as fast as anyone can, but once you’ve seen what’s possible, you won’t be able to wait to apply the next “Git ‘er Done Faster” speed hack to your CNC work.
#24-#27 Use Twist Drills instead of endmills where possible
All other things being equal, not much removes material as fast as a twist drill. Consider a 1″ diameter hole that needs to be 1/2″ deep in 6061 aluminum. If we interpolate that hole with a nice 5/8″ Carbide Endmill, we get circa 6.4 cubic inches a minute of MRR. But, if we use a 1″ Carbide Twist Drill instead, we get 32 cu in/min! Even an HSS Twist Drill gives 9.6 cu in/min.
Not fair using a bigger twist drill? Hey, those are the breaks. We often have bigger twist drills at hand. Added bonus: Twist drills can be cheaper for a given size too, and any shop should be able to sharpen them to give them a long tool life.
Consider this hack in these situations:
#24: Making holes
#25: Making the initial hole needed for a pocket. A nice 1″ indexable drill in the tool changer can save a lot of time here when pocketing. Just be sure the tool change time doesn’t eat it up. If you can arrange to drill all the starter holes for your pockets with one tool change, you may more than make up for slow tool changes too.
#26: Drill your pocket corners, especially on deep pockets with tight corners where deflection is a problem.
#27: Consider chain drilling your pocket or slot. In fact, the modern equivalent of chain drilling is a plunge milling toolpath if your CAM software supports it.
#28 Find the optimum combination of Cut Depth and Cut Width [Absolutely Critical to Master This!]
How do you figure Cut Depth and Cut Width (stepover)?
Most CNC’ers use rules of thumb that have worked for them for years with a little bit of adjustment perhaps for the particular problem at hand.
Here’s the problem with that:
The biggest leverage you have to affect your Feeds and Speeds and the MRR’s that result comes from picking the optimum combination of Cut Depth and Cut Width.
Yet, most CNC’ers are ignoring that advantage. Go figure!
Optimizing these two is not an easy task as they interact with each other and many other variables. More cut depth is great because it spreads wear over more flute length and allows fewer passes on deep pockets. OTOH, it also means more tool deflection plus penalties for chip clearing being more difficult. Cut Width allows faster feeds and speeds the less of it there is, but there is a point of diminishing returns that most don’t realize, even on HSM toolpaths. The cutter gets to whizzing around like crazy but ultimately not removing as much material as if it went slower.
The only good way to optimize the combination of these two is by trying lots of scenarios. When I say lots, I mean hundreds–who has time for that!
Fortunately, G-Wizard Calculator has a feature called CADCAM Wizards that will do the task of comparing hundreds of scenarios for you, completely automatically, and in a matter of just a few seconds. Here’s the quick tour of CADCAM Wizards that’s part of the Getting Started Tour package built right into the product.
#29 Use as many flutes as possible for higher MRR’s
The more flutes, the faster the feedrate at a given spindle rpm. In aluminum, you can often use 3 flutes instead of 2 and go 50% faster as a result. With harder materials, you can go with 5, 6, or even more flutes. Sometimes this is the only way to get decent MRR’s for really nasty materials as the spindle rpms have to be kept low.
In a world of fancy indexable tooling and exotic geometries, the corncob can sometimes seem Old School. But they have some great advantages:
They can run a higher chip load (hence faster feedrates) than regular endmills because the serrations make the chips smaller and therefore easier to remove in quantity.
They are often less susceptible to chatter. The serrations inject additional frequencies that can break up the chatter resonances.
The combination of these effects is significant. To add support for corncob roughers to our G-Wizard Feeds and Speeds Calculator, I went through the offerings from 10 different endmill manufacturers and reviewed the chip load multiplier for their corncob roughers versus the closest equivalent finishing endmill for aluminum and steel. When doing these kinds of analysis, I have a statistical model I use to clear out the far outliers and get to an amalgamated value that is better than a simple average. It’s proprietary so I won’t go into it.
When all of that was said and done, I wound up with a corncob bonus G-Wizard awards these roughers of 38%! Is it worth a toolchange to get a 38% increase in Material Removal Rate? You be the judge, but I really like using this style cutter.
#31 Use Rest Machining and a Big Ole Rougher
We mentioned Rest Machining above. It’s a feature some CAM software has where it knows what material has already been removed by prior operations. With Rest Machining, you can fire up a Big Ole Rougher and finish the job with a much smaller cutter. A big indexable or corncob rougher can significantly shorter a job because it clears material so much faster.
HSM, Trochoidal Milling, Volumill, and many other names are applied to these fancy toolpaths. They work by never pushing the cutter into corners. Instead, they loop around, shaving off material, so the cutter never sees the sledgehammer burst of cutting force that happens when it slams into corners suddenly. As a result, MRR’s can be much higher.
The trick is in finding the optimal Cut Width and Cut Depth for these fancy toolpaths. Let CADCAM Wizards (see above) do that for you. They work well for HSM toolpaths!
Scotty! I Need More Tool Life!
But somehow, he always did deliver that little bit more to save the day…
#33 Lose a few rpms
OK, it’s not the best idea when MRR’s have to stay sky high, but cutting the rpms even a little pays big dividends for tool life. Many shops cut the rpms by as much as 15% during lights out operation to reduce the likelihood of a tool breaking for that reason.
Just be sure to reduce your feedrates by the same percentage or your chip loads go up and she really will blow. Never cut the rpms without reducing feedrate first.
#34 Use a proper feeds and speeds calculator
I almost hate to bring this one up because it seems so self-serving, but you need to use a feeds and speeds calculator. There really are no shortcuts that do the job. You can hear really bad feeds and speeds but your ear can’t discern good feeds and speeds no matter what you may think or have been told. If it could, you’d be able to buy “ear training” CD’s for machinists, and all the big shops would make you take audible tests. Similarly, rules of thumb and the like don’t work. Sure, you may have rules of thumb that are so conservative you’re not breaking tools, but the actual physics are so complex any simple rules of thumb are leaving money on the table.
Our customers report a whalloping 56% improvement in tool life when they started using our G-Wizard Calculator. I have to admit, I was shocked to read that, but that’s the actual figure they gave us when we surveyed them. Our testimonials are full of anecdotes from real users about how much it helped.
Use a proper Feeds and Speeds Calculator for big wins in tool life and cutting speeds…
How is all this possible?
Look, G-Wizard considers over 60 variables when computing feeds and speeds. Plus, it has powerful tools like CADCAM Wizards that can look at hundreds of combinations of variables to find the best possible combination. Nobody can do that with rules of thumb, spreadsheets, or by listening to the cut.
#35 Avoid tool deflection
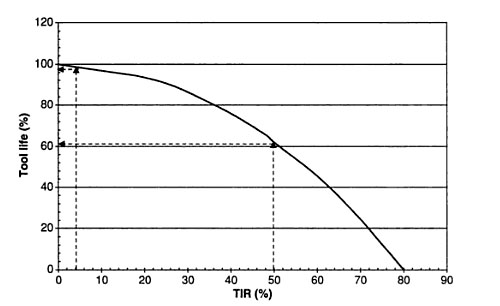
Most CNC’ers are rightfully wary of runout. They know the impact runout can have on tool life is severe. Here’s a great way to visualize the damage that runout can do:
As runout approaches 50% of chip load, tool life falls off rapidly…
As runout approaches 50% of chip load, tool life falls off rapidly. But how does it do this damage?
Simply put, runout means your tool isn’t spinning in a true circle. It wobbles and as a result, some flutes wind up doing almost all the work. And, that work is additive to the chip load the flute was already designed to do. If you maxed out the chip load as you should for best performance, adding runout on top of that is truly abusive.
What does all of this have to do with Tool Deflection?
Glad you asked, here’s the scoop:
Tool Deflection does exactly the same thing to Tool Life that Runout does.
Most CNC’ers don’t bother even checking tool deflection even though they wouldn’t dream of operating with as much runout as they are the amount of tool deflection they’re getting. They wonder why Tool Life is poor and accuracy often suffers.
Tool Deflection is just one more way Nature is telling you to use a proper Feeds and Speeds Calculator. That’d be one that indicates how much deflection you have and sets limits on it. If you exceed the limits, it should squawk, because even though you’ll get away with it for a while, you’re really damaging Tool Life and should be aware of the trade-off you’re making.
#36 Avoid Rubbing: Don’t Go too Slow or too Thin!
Here’s a classic Feeds and Speeds mistake:
You decide to be ultra-conservative so you take the feedrate way down and choose an extremely small Cut Width. Your thought is you’re taking it easy on the cutter by running this way, but in fact, you may be giving that poor cutter the worst possible treatment. The reason is you may be forcing it to rub.
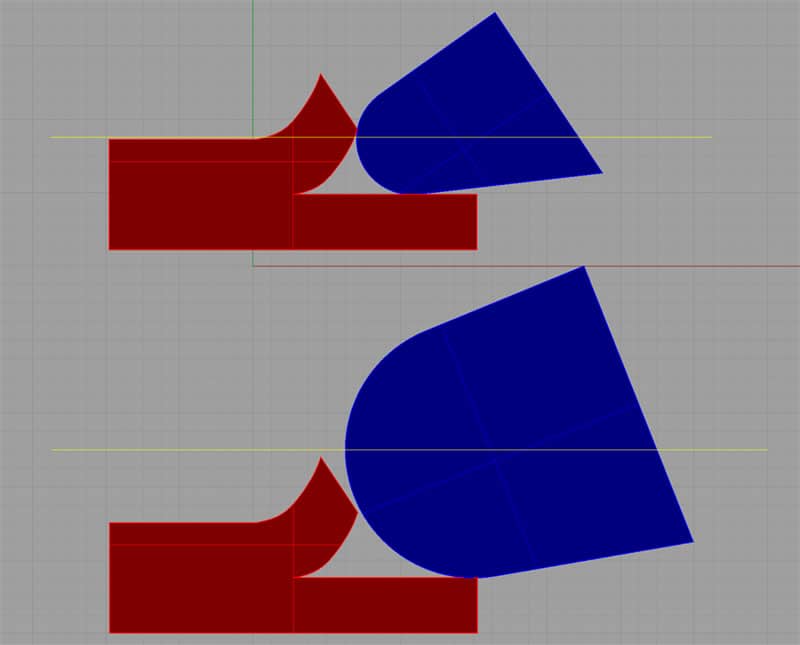
Rubbing happens when the chip load is too low–lower than the radius of the cutting edge. If we look at the cutting edge versus the chip under a microscope, it would look something like this:
The top cutter is cutting because the edge can get under the chip. The bottom cutter is rubbing, the chip load is too small and the edge won’t go under the chip.
The top cutter is cutting because the edge can get under the chip. The bottom cutter is rubbing, the chip load is too small and the edge won’t go under the chip. As a result, the cutter plows along on top of the material and it has to pull chips up by friction rather than by slicing them. That friction turns into heat which will burn up your cutter fast if left unchecked.
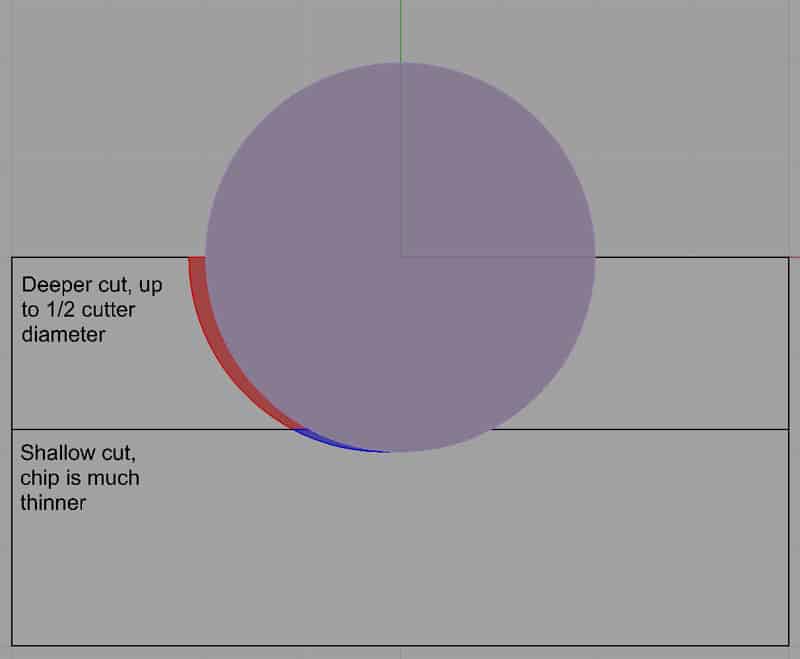
There’s a second complicating factor called “Radial Chip thinning”. When Cut Depth is less than the radius of the cutter, the chips are not as thick as you think due to Radial Chip Thinning. This diagram shows why:
Radial Chip Thinning makes chips thinner than expected as Cut Width falls below the radius of the cutter…
Radial Chip Thinning makes chips thinner than expected as Cut Width falls below the radius of the cutter. The lower the Cut Width, the more pronounced Radial Chip Thinning becomes. That’s why reducing Feedrate and using less Cut Width at the same time can cause rubbing in a hurry as chip load plummets.
What’s the answer to all this?
Well, you could add it to the long list of feeds and speeds calculations you need to make for every cut, or you could let our G-Wizard Calculator deal with it. G-Wizard figures Chip Thinning automatically and accelerates the feedrate to offset chip thinning. On top of that, it is the only Feeds and Speeds Calculator that will give you a rubbing warning too.
#37: Don’t cut too thin in work hardening materials.
You want the cutting edge to be able to get under the work-hardened top layer as quickly as possible. Larger Chiploads and higher Cut Width will facilitate that.
#38: Don’t recut the chips
I tell everyone who will listen to be paranoid about recutting chips. Make sure the coolant is set up to get rid of them. Sometimes flood coolant turns into “dribble” coolant because machines lack full enclosures and the machinist wants to avoid a mess. Use mist for those machines as the dribble just covers up the chips sitting in the cut so you can no longer see them.
Just imagine you’re cutting some nasty work hardening material. Recutting chips is the same as scattering hardened metal chips ahead of the cutter. It just isn’t going to live as long if you treat it that way.
#39: Choose Toolpath options in your CAM software to make Cut Entry and Exit more gentle
A lot of cutter wear starts on entry to the cut. You may even chip the edge there, especially in tough work-hardening materials. The solution to this problem is to adopt gentler entries. Avoid plunging the cutter. Instead, use one of these strategies:
– Ramp in, with a relatively gentle ramp.
– Helix or spiral in.
– Use a decent-sized indexable drill to create a hole for entry.
– For profile cuts and surfacing, arc into the cut.
There you have it: 39 different Feeds and Speeds Hacks to help make you a Better CNC’er. I know you’ve heard of some of these, but I’d be surprised if you heard of and use them all.
What Hacks do you use that we didn’t cover? Share the wealth by telling us in the comments!
Like what you read on CNCCookbook?
Join 100,000+ CNC'ers! Get our latest blog posts delivered straight to your email inbox once a week for free. Plus, we’ll give you access to some great CNC reference materials including:
Bob is responsible for the development and implementation of the popular G-Wizard CNC Software. Bob is also the founder of CNCCookbook, the largest CNC-related blog on the Internet.
Good article to review principles to keep in mind whether or not you are trying to hack something.
I recently came across Circle segment barrel cutters and conical circle segment barrel cutters. It took a while to understand the principle and how they would be used. Then about some of the 5 axis G-code programing needed to use these. Could you comment.


Hi Bob
Good article to review principles to keep in mind whether or not you are trying to hack something.
I recently came across Circle segment barrel cutters and conical circle segment barrel cutters. It took a while to understand the principle and how they would be used. Then about some of the 5 axis G-code programing needed to use these. Could you comment.
Reference these two blog posts:
http://www.moldmakingtechnology.com/blog/post/barrel-cutters-going-mainstream-
http://www.moldmakingtechnology.com/articles/broadening-cam-applications-for-barrel-cutters
Thank You