Pockets are cavities in the top of the part. Or, at least the face that’s on top during the milling process. They can have a floor, or they can be open by piercing all the way through the material’s thickness. The main thing about pockets is they’re closed on the sides, but even that is not a hard and fast requirement as some people speak of pockets that have an open side. I prefer to think of open-sided pockets as just part of a 2D profile.
The original text was not provided. Could you please provide it?
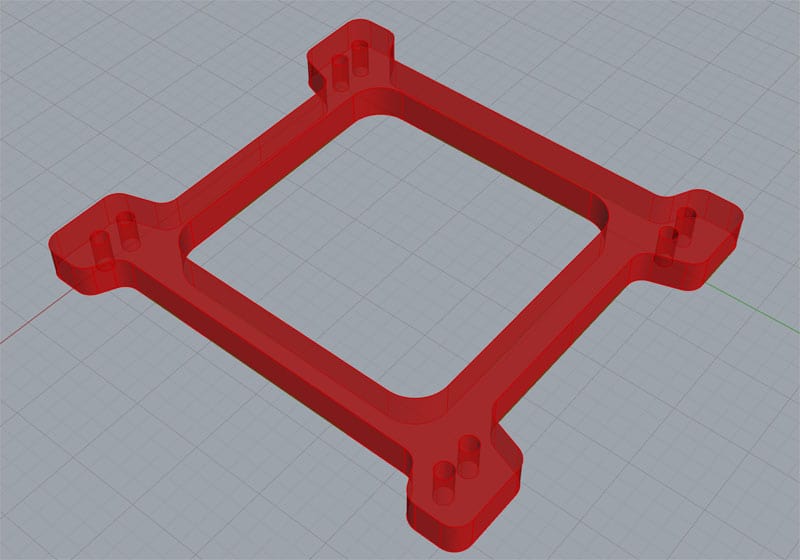
The cavity in the middle of this carb spacer is a pocket…
What Tools Do I Choose for Pockets?
Like 2D Profiling, we use Endmills for pockets. In fact, the selection process is nearly identical:
The Material determines the number of flutes and we use the same number for 2D Profiling as for Pocketing.
The choice of Carbide vs HSS is also the same in terms of trade offs.
Diameter and Length choice are the same as well.
So what’s different about Pocketing versus 2D Profiling?
Not much other than the fact that we are more likely to encounter tight inside corners that limit our tool diameter. The other thing is that the pocket may have a floor, so we need to consider how we’ll finish that floor. The requirement to finish the floor of a pocket together with the fact that the pocket is surrounded on all sides means we’ll be using the bottom of the endmill to cut pockets, which is not something we’d normally do when 2D profiling.
When 2D Profiling, we can generally approach from the sides, preferably tangentially to the wall, and just go right in and start cutting. With a pocket, we can’t penetrate the wall so we have to come in vertically. It’s like landing a helicopter onto a helipad versus taking an airplane in on a runway.
Entry Strategy When Pocketing Plus Center-Cutting Endmills
There are at least three ways to get our tool vertically into a pocket so we can start cutting with the sides of the endmill. Cutting with the side is much more efficient and the tool can last a lot longer than cutting with the bottom of the endmill. We want to pay careful attention to how we’ll transition from bottom cutting to side cutting.
Plunge Entry: Simple But Toughest on the Cutter
The simplest way to get our cutter in is just to plunge it vertically as if it were a Twist Drill. There are some issues with this. First, not all endmills are “center-cutting.” The cutting edge may not extend all the way to the center, so they can’t plunge straight down, at least not very far. Be sure to check whether yours is center cutting before you decide to plunge it.
The second issue is that plunging is absolutely the worst thing for tool life. The endmill is down in a cylindrical hole that completely encases it. Coolant has a hard time getting down that hole and chips have a hard time getting up the hole. On the whole (sorry for the pun, couldn’t resist), plunge is a terrible experience for your poor cutter.
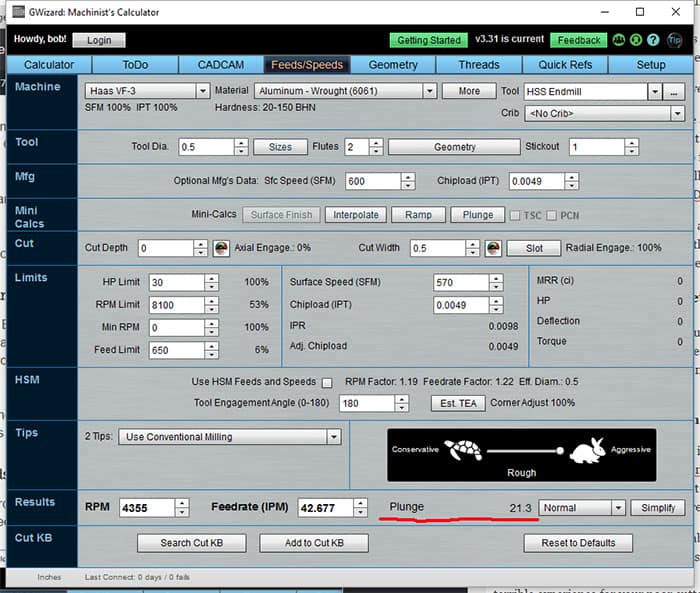
To minimize Tool Wear when plunging, be sure you use special plunge rate feeds and speeds. Our G-Wizard Calculator will give these two you:
You need a special plunge feedrate (in red) to minimize excessive wear on the tool…
If you’re working with tough materials or if you need to go more than about 1 diameter deep, you probably should use an alternative to a plunge to enter the pocket and get down to cutting depth.
Pre-Drilled Hole
While we’re on the topic of plunging, another approach is to pre-drill a hole with a twist drill. This works extremely well, especially if we can pre-drill a hole that’s bigger than the endmill to provide clearance for coolant to get in blast the chips back out.
The downside of pre-drilling is it requires a tool change. Twist drills can remove material very quickly, so you’ll have to evaluate whether the tool change is fast enough to make it worthwhile to pre-drill. This strategy can be very effective if you have multiple pockets because you can pre-drill them all at once and save on tool changes.
Ramp Down
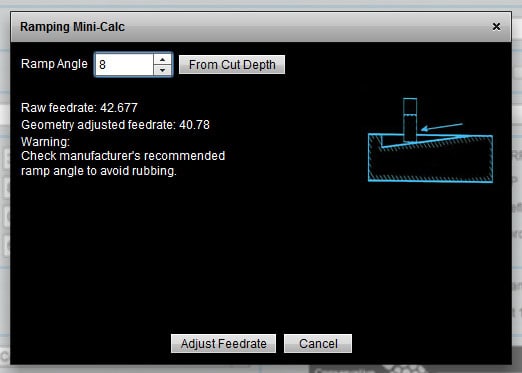
Ramping down means moving the tool horizontally while it is going deeper. It’s a much better strategy than plunging from a tool life standpoint. G-Wizard has a special ramp angle calculator that can help you figure the feeds and speeds for the ramp:
Feedrate for ramping can be nearly the same as horizontal motion if ramp is gentle enough…
The feedrate for ramping can be nearly the same as horizontal motion if ramp is gentle enough. There’s not much to argue against ramping except that it can prolong the time the cutter is in a slot, and hence shrouded somewhat from coolant. It’s harder to pull chips up out of a deep slot unless the mist, air blast, or coolant is aimed perfectly into the slot, which can be hard to arrange.
Helix Down
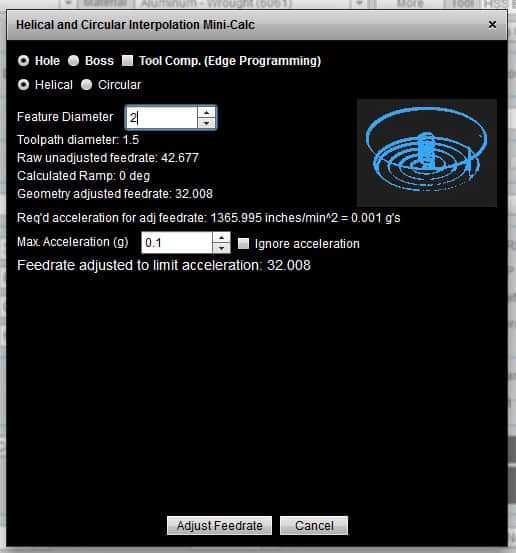
Our final approach would be to helix down. This is similar to interpolating a hole and is usually my preferred approach. If we can helix out a fairly large area, it makes plenty of room to clear chips. Plus the helix is fairly gentle on the cutter.
As you might expect, G-Wizard has a calculator for feedrates on these helixes too:
G-Wizard can help adjust feedrates for Helixes too!
Bullnose End Mills and Roughing End Mills
Here’s a trick that can give a little better finish and a little longer tool life–use a Bullnose Endmill. This is an endmill that has a slight radius on the bottom edge rather than being a strict cylinder. That radius will leave a better finish on the floor of the pocket and it will promote longer tool life.
Bullnose Endmills cost a little more, but they’re often worth it, especially for pockets.
On the roughing side, try using a serrated roughing end mill. These end mills can really get down to business when it comes to roughing. Their only downside is you can’t finish with them, so you’ll be adding the cost of some tool changes to the job. However, they run enough faster than regular end mills that any tool change cost should be more than made up for by faster roughing.
Conclusion
Those are the basics of choosing cutters for pockets. Like the 2D pockets, G-Wizard Calculator has a special CADCAM Wizard that will recommend a tool and figure out all the feeds and speeds for it to do a roughing and finishing pass with a minimum of effort from you. Give our G-Wizard 30-day free trial a look if you think that would be helpful. Next up we’re going to talk about 3D Machining (what some people call “carving” with a CNC) and Engraving.
Like what you read on CNCCookbook?
Join 100,000+ CNC'ers! Get our latest blog posts delivered straight to your email inbox once a week for free. Plus, we’ll give you access to some great CNC reference materials including:
Bob is responsible for the development and implementation of the popular G-Wizard CNC Software. Bob is also the founder of CNCCookbook, the largest CNC-related blog on the Internet.

")
")


