Similar to other endeavors, 3D printing comes with its own learning curve. Presently, we have a new 3D printer here at CNCCookbook, which we are learning to use efficiently. As a result, you can anticipate to see many 3D printing-related articles until we master its usage. Once we’ve optimised our printing process, we’ll resume a more balanced mix of articles.
One of the issues in getting great prints is getting your extruded print to stick properly to the bed when printing. If it comes lose or warps up, you can imagine this will seriously reduce the quality of the print perhaps to the point of making the print useless. There are a lot of techniques out there that have been tried, and these can vary from one filament material to the next. At this stage, I’m focused on ABS filament, so I went through the SeeMeCNC forums to identify the best techniques for ABS. A number of great articles are available, which I want to summarize here.
– ABS doesn’t want to adhere to bare glass, so you will need to do something about that.
– Bed adhesion methods in order from best to worst are:
PET or Kapton tape with ABS juice. ABS “juice” is ABS dissolved in acetone. While this is the most secure, it sure sounds like a nasty smelly mess.
ABS Juice directly on the glass. Yeah, ditto on the nasty smelly mess.
Glue Stick. I’ve got some Elmer’s “Disappearing Purple” glue sticks on order because that’s what the manual for the Rostock printer suggests.
Hairspray. Unscented Aquanet is preferred.
– There’s a suggestion to lower bed temp 5-10 degrees after the first 20-30 layers. Controlling ambient temps also helps and there are articles about people enclosing their 3D printers to stabilize the temperatures inside the printing chamber.
– The bed doesn’t hold temps all the way out to the edge. A 1/4″ aluminum plate between the bed and the glass will help keep temps happy near the edge. Good idea!
That’s the conventional wisdom, but there’s always the fancy “silver bullet” solution that just works better, though it can cost a bit more.
That brings me to the next article I tried, which was PEI Bed Experiments. This article was written by Michael Hackney, who has been a contributor here on 3D printers. He swears by the PEI method, which he says was originated by the European SpiderBot people. As Michael suggests, getting some PEI sheet glued to thin aluminum and making a couple so you can swap them out seems ideal. It all sounds great, and is supposed to be good for both PLA and ABS filament, so I ordered a sheet of this PEI to try out from Amazon, per Michael’s link.
Michael’s initial procedure to adhere the PEI material to the boro-silicate glass bed involved silicone adhesive in an aerosol can, but it eventually failed. Evidently couldn’t take the heat. The new and improved method uses some special double sided tape intended for high temps. The key is in applying the tape to avoid bubbles:
1. I triple-washed the glass, after scraping it down with a razor blade. a cleaner, then windex, then isopropyl alcohol
2. I put the tape on, applying from one side across, with a 2′ long 2″ rod as a “flattening wheel”, which I “steamrolled” the tape down.
3. I isopropyl’d the PEI, let it dry, then laid it down with a minimum of curling of the plastic. I was more worried about injecting some curl into the plastic than getting it down perfect.
4. weight.. 240 lb of batteries stacked on the plate overnight, on a flat surface. I figured that had the psi rate high enough to resolve most issues… 😀
The tape is a 3M product called “TapeCase 468MP”. I ordered 2 rolls (10 yards) of the 3/4″ wide stuff from Amazon. Use a roller of some kind to get the bubbles out. Also, the stuff has an affinity to pick up whatever is floating around–hairs, dust, you name it. So try to work in a clean area with it.
Here’s his procedure to adhere the PEI material to the glass bed:
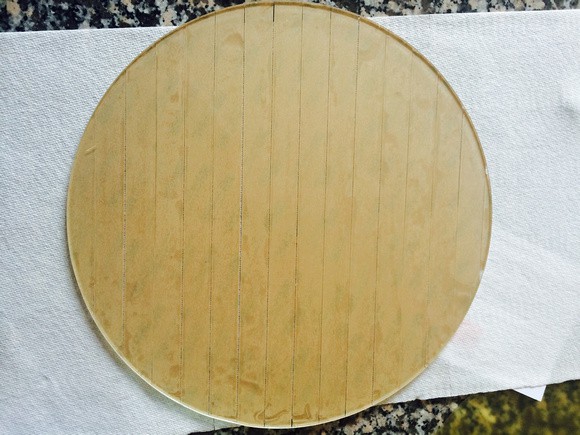
Apply tape with backing, and burnish it down with a plastic scraper:
Backing paper still on top…
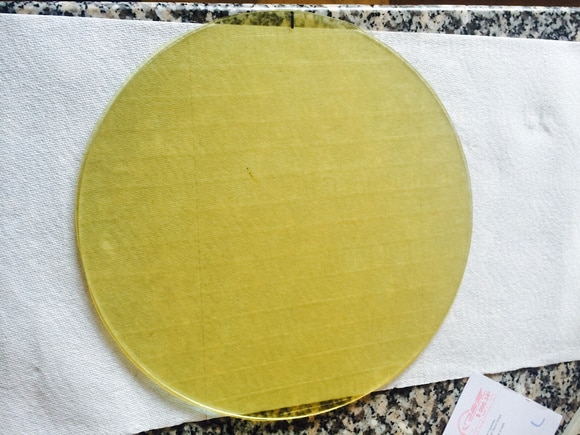
View from below after burnishing…
PEI carefully lowered into place after the backing paper was removed. Burnishing to tease the bubbles out…
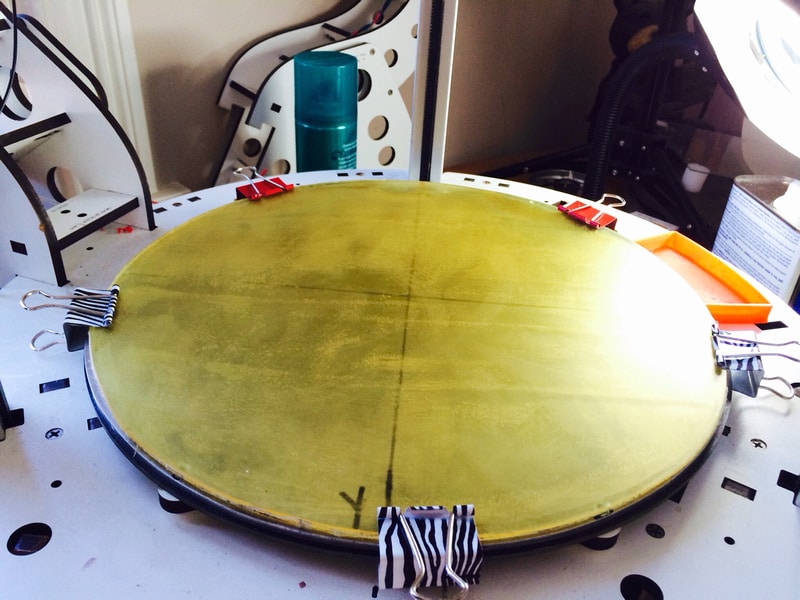
Here is the result:
Snazzy clips, eh?
The results are said to be game changing:
1. no more pulling the glass to clean and re-apply Kapton tape.
2. No more hair spray.
3. no more constant recalibration. just fire it up and print!
4. lower print temp is nice as well – i’m running 210/100 on first layer and 205/90 thereafter. This speeds up the ramp-up time by a few minutes…
This sure sounds like a massive improvement over glue sticks, Kapton tape, ABS “Juice”, or hairspray–simpler, easier, and more reliable.
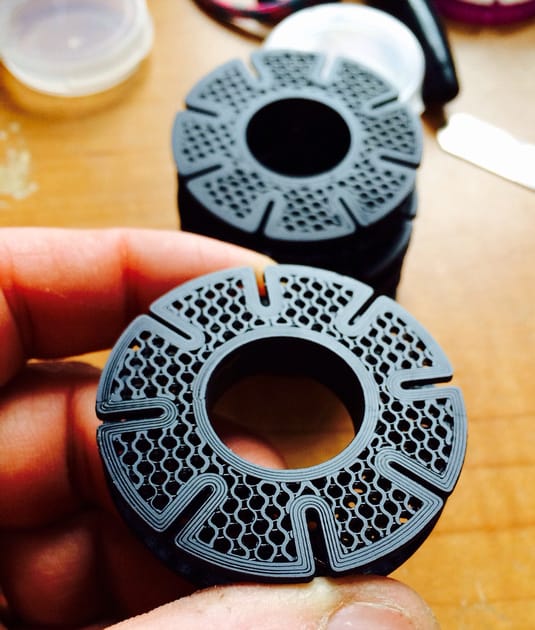
Michael cleans the PEI surface with a swipe of Isopropyl Alcohol before each print. His results look excellent:
Very professional looking parts!
Make sure you recalibrate the bed after putting the PEI plate on. Also, you can print at cooler temps with PEI. Try as much as 30C lower than with Kapton tape. One fellow says he just leaves his bed set for 80C for PLA and ABS and it works great.
I don’t know whether I will be patient enough to start out with a PEI bed or whether I’ll get started printing with the glue sticks. One thing is for sure: the PEI bed is inevitable. Now why isn’t someone manufacturing them for the Rostock printers?
Like what you read on CNCCookbook?
Join 100,000+ CNC'ers! Get our latest blog posts delivered straight to your email inbox once a week for free. Plus, we’ll give you access to some great CNC reference materials including:
Bob is responsible for the development and implementation of the popular G-Wizard CNC Software. Bob is also the founder of CNCCookbook, the largest CNC-related blog on the Internet.
Get yourself a roll of Blue Painters Tape. I have had really good results using this Tape along with a heated bed with the ABSS material. In fact you have to be careful when removing the parts because they stick so good. I lift the Tape from the outer edge and pull it up towards the part, the part comes off with the Tape and then you remove the Tape from the part.
Yes, I have tried all the other methods and was not impressed. Nothing was even close to the Blue Tape. Give it a try.
Here’s some additional info on my setup when using Blue Painters Tape with ABS.
(a) Get the wide Tape for easier installation.
(b) I am using a Glass Plate clamped to my Bed Heater.
(c) Lay the Tape side by side for your larger parts.(edge to edge, don’t overlap)
(d) Temperatures I am using:
Extruder Heater. 230C
Bed Heater 90C
I would like to try the Green Painters Tape to see if it works just as good as the Blue? They both are very thin compared to regular Masking Tape. I suspect the results will be similar?
Do you know of any Videos other than the one on the manufactures Web Site? It only shows a smaller part (approximate one inch in diameter) being printed & removed. This show the products ability to hold the smaller parts, but what about removal of larger ones? I am thinking that something with a area of twenty to twenty five square inches is going to be a struggle?
Rich, am I the only one thinking that BuildTak is probably just PEI with an adhesive backing? I notice Michael Hackney left them a review that sounds just like what he says about PEI. Price is right for the stuff. I have already ordered the raw sheet, so I will stick with trying that. I did ask the BuildTak people to send me a sample for review. If they do so, I will let you all know how it works.
I’m currently printing some fairly large structures on a FlashForge Creator (think of it as a MakerBot Replicator knock-off.) I’ve gone with the heated enclosure on Kapton. The platform temperature is at 215C. My prints are ~8.5″ x 5.5″. You might want to look up “helper disks”. I have found that by adding helper disks, I can significantly reduce the amount of corner warping. The PEI material looks interesting.
Bob – I’ve been following the development of the PEI bed solution on the SeeMeCNC forums and on the Delta Google Group. I finally got a chance to play with it today, and I have an issue printing with PLA. I can’t get good adhesion until I preheat the bed up to 80ºC, and that hot of a bed gives me bad prints due to the PLA being kept too hot. Does anyone have more information about printing PLA on PEI?
I find it hilarious that people are using this post to pushing blue painter’s tape and window tint films without bothering to test this material. Talk about not bothering to consider the post.
I’ve been using PEI for a couple months now, after having used Kapton, blue tape, ABS juice + glass, ABS juice + Kapton on glass. It’s all aggravating. Having gotten the machines set up and the feel for PEI, I don’t see any reason to use any kind of adhesives, solvents, sprays, wipes or tapes. All that other stuff is annoying to either apply, remove or both, and often has to be reapplied every few parts. I’ve made hundreds of parts on one single PEI, and it’s only just a tiny bit scuffed. I might use a tiny bit of sandpaper to make the texture consistent again.
I just did a part that’s 10″ x 4″ full contact and it just didn’t warp. It just took a tiny bit of force to remove it once the heat bed was cool.
There’s a new product called the MagHold Build Platform on Amazon that currently fits Flashforge / Quidi / Makerbot Replicator type printers with 3 adjustment screws. It’s made to be simple and is easy to remove prints. Pops right out and doesn’t scratch surface. Youtube has a video on how it works: https://www.youtube.com/watch?v=zhD5vvp8HmM . The product is made by http://www.3dprintermods.com.


Hi Bob
Get yourself a roll of Blue Painters Tape. I have had really good results using this Tape along with a heated bed with the ABSS material. In fact you have to be careful when removing the parts because they stick so good. I lift the Tape from the outer edge and pull it up towards the part, the part comes off with the Tape and then you remove the Tape from the part.
Yes, I have tried all the other methods and was not impressed. Nothing was even close to the Blue Tape. Give it a try.
Willy
Here’s another alternative, from Inventables.com called “BuildTak”
https://www.inventables.com/technologies/buildtak-3d-printing-build-surface
Hi Bob
Here’s some additional info on my setup when using Blue Painters Tape with ABS.
(a) Get the wide Tape for easier installation.
(b) I am using a Glass Plate clamped to my Bed Heater.
(c) Lay the Tape side by side for your larger parts.(edge to edge, don’t overlap)
(d) Temperatures I am using:
Extruder Heater. 230C
Bed Heater 90C
I would like to try the Green Painters Tape to see if it works just as good as the Blue? They both are very thin compared to regular Masking Tape. I suspect the results will be similar?
If you have any questions please let me know.
Cheers
Willy
Hi Rich
Do you know of any Videos other than the one on the manufactures Web Site? It only shows a smaller part (approximate one inch in diameter) being printed & removed. This show the products ability to hold the smaller parts, but what about removal of larger ones? I am thinking that something with a area of twenty to twenty five square inches is going to be a struggle?
Cheers
Willy
Rich, am I the only one thinking that BuildTak is probably just PEI with an adhesive backing? I notice Michael Hackney left them a review that sounds just like what he says about PEI. Price is right for the stuff. I have already ordered the raw sheet, so I will stick with trying that. I did ask the BuildTak people to send me a sample for review. If they do so, I will let you all know how it works.
I’m currently printing some fairly large structures on a FlashForge Creator (think of it as a MakerBot Replicator knock-off.) I’ve gone with the heated enclosure on Kapton. The platform temperature is at 215C. My prints are ~8.5″ x 5.5″. You might want to look up “helper disks”. I have found that by adding helper disks, I can significantly reduce the amount of corner warping. The PEI material looks interesting.
Bob,
In addition to the PEI, the seemecnc forums have been discussing window tint as a build surface.
Initial results look to be varied among members, but the type and brand of tint likely is the culprit.
Bob – I’ve been following the development of the PEI bed solution on the SeeMeCNC forums and on the Delta Google Group. I finally got a chance to play with it today, and I have an issue printing with PLA. I can’t get good adhesion until I preheat the bed up to 80ºC, and that hot of a bed gives me bad prints due to the PLA being kept too hot. Does anyone have more information about printing PLA on PEI?
Tim, you might try BuildTak. I am happy enough with it that I haven’t even mounted the PEI.
I find it hilarious that people are using this post to pushing blue painter’s tape and window tint films without bothering to test this material. Talk about not bothering to consider the post.
I’ve been using PEI for a couple months now, after having used Kapton, blue tape, ABS juice + glass, ABS juice + Kapton on glass. It’s all aggravating. Having gotten the machines set up and the feel for PEI, I don’t see any reason to use any kind of adhesives, solvents, sprays, wipes or tapes. All that other stuff is annoying to either apply, remove or both, and often has to be reapplied every few parts. I’ve made hundreds of parts on one single PEI, and it’s only just a tiny bit scuffed. I might use a tiny bit of sandpaper to make the texture consistent again.
I just did a part that’s 10″ x 4″ full contact and it just didn’t warp. It just took a tiny bit of force to remove it once the heat bed was cool.
There’s a new product called the MagHold Build Platform on Amazon that currently fits Flashforge / Quidi / Makerbot Replicator type printers with 3 adjustment screws. It’s made to be simple and is easy to remove prints. Pops right out and doesn’t scratch surface. Youtube has a video on how it works: https://www.youtube.com/watch?v=zhD5vvp8HmM . The product is made by http://www.3dprintermods.com.